


Sunday, July 24, 2011
Heater Fan
We attached the fan to its mounting point by drilling 2 holes in each side and making a small aluminium plate to act as purchase for the rivets. It was then riveted in place and the mounting bolts for the brake and clutch resevoir holder used to clamp the mounting plate firmly to the scuttle. This means that it is firmly attached despite being quite a heavy item and hopefully shuold keep supplying warm air for the Victorian winters in years to come!
Rear Caliper Issue
 On bleeding the rear calipers we discovered an issue - they leaked badly. After attempting to tighten them with force failed, we loooked a bit more closely and discovered the bleed valves were placed inside two adapters. This looked odd so we removed them to discover the adapters were BSP or NPT fittings that had beeen forced into a straight walled metric fittings. Any seal formed had been acheived by mangling the first few threads and bunging on some sealant.
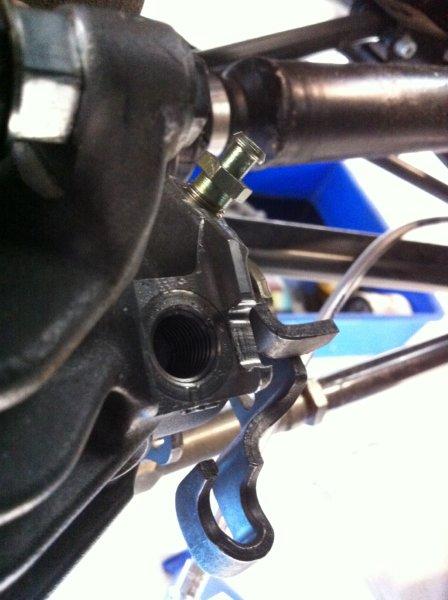 I would strongly urge those with birkins of this era to check up on the calipers as it is not a great engineering solution. After peering under cars with similar calipers it would appear that Birkin have swapped the position of the bleed valve and brake line - leaving a fitting too big for even a truck bleed valve and hence the "solution!" We had the original hole retapped and coiled and ground off the lip in the casing to allow the brake banjo fitting to leave the caliper at the right angle. This meant getting a larger banjo fitting attached to our brake lines and getting bleed valves that matched the original smaller holes but the end result is a system that has not leaked a drop and has the bleed valve at the highest point of the caliper where it was intened to be.
Sunday, February 6, 2011
Battery Mount
 There's a few places to put the battery, including on the scuttle or in the nose by the steering rack. The former is low but out front, and also awkward to reach for those jump-starting moments which I'm informed are pretty regular occurences. The scuttle is good but we're trying to keep it uncluttered - especially as we're planning to put a huge air filter there some day. So we decided on the wall in front of the passenger footwell.
First we riveted in a plate to the chassis tubes to help take its weight, and covered this in foam strips from Clarkes. We then got a steel bracket made up to enclose the battery and bolted this to the footwell wall. Rob from Meridian fabricated the bracket as it's something they've made several times before and it fitted nicely. We had to take a bit off the edge of the starter motor and cut a resess in the bracket to allow for a bell housing bolt - we expect the engine to rock a bit under torque and don't want them to touch. All in all the hardest part was drilling in a confined space and a right angled drill bit was a big help for this. We still managed to scuff the bracket but rest assured this will be tidied up soon!

Sunday, January 23, 2011
Water Rail

We have finally added the water rail which is from Raceline. It's a lovely bit of engineering, with plenty of take-offs for temp senders and heaters. Due to the Birkin headers being a bit tall, it does need some modification to fit over the exhaust manifold of number one cylinder.
 This was achieved with the angle grinder and a metal file. Rob from Meridian welded a plate over the resulting gap and once a few troublesome bosses were ground off the engine block the rail fitted as nature intended. It looks great!
Saturday, January 22, 2011
Carbon canister and fuel reg


We've used a Toyota MR2 carbon canister as it's very small and fits nicely in between the tank and the side wall of the chassis. The bracket was fashioned from 2 hose clips riveted to a strip of steel which had been bent to suit the profile of the canister. The canister was wrapped in two strips of sticky foam, the clips tightened and the whole thing was bolted to the car with minimal stress. Which was a first......
At the same time we attached a fuel filter and pressure regulator to the back wall of the cockpit, as our pump doesn't have one inbuilt. They are pretty standard items and again didn't require any Anglo-Saxon language. We'll tidy up the lines as we go along as I think they will need protecting from abrassive contacts - for now though we'll just cable tie them out of the way

Wednesday, November 3, 2010
Windscreen mounts
+of+IMG_4841_2_1.JPG)
We recently popped the scuttle on to drill the windscreen mount holes. For some reason this was a job we'd really been putting off. Something to do with a complete lack of hand eye co-ordination and the fact that now that parts are painted we live in fear of scratches and dings (despite the fact that when we first drive it its bound to get stone chips everywhere!)
 However, by using very small pilot drills bits for accuracy and a pair of calipers to check the distance between the holes on the mounting bracket, it all went without much loss of life. Drilling into your pride and joy still feels very wrong though - similar to the dashboard experience - and we were glad when it was all over.
Gauges

As with all builds we've had a bit of a hiatus while we wait for bits and pieces to turn up. Since the gauges arrived we decided to slot them in along with a few dash board lights.
The gauges are Stack items, which are black faced and therefore fairly traditional, but they're also backlit, which looks pretty cool.
_2_1.JPG) As suspected not all the sizes matched up. For the dash light this was easy to fix as it just involved a step drill, but the tacho was a different matter as the hole needed to be shifted right as well as being enlarged. An old school compass, a bit of card, some masking tape and a metal file later and all was serene. It's not very relaxing atttacking your carbon fibre-like dash board and I was glad when it was over!
As suspected not all the sizes matched up. For the dash light this was easy to fix as it just involved a step drill, but the tacho was a different matter as the hole needed to be shifted right as well as being enlarged. An old school compass, a bit of card, some masking tape and a metal file later and all was serene. It's not very relaxing atttacking your carbon fibre-like dash board and I was glad when it was over!
Subscribe to:
Posts (Atom)