The shocks are back! Insert bad pun here. Towards the end of september I was able to speak to Nitron and they said they would ship on or about the 21st. On that very day they emailed me a tracking number as requested and they arrived at Meridian Motorsport on the 24th or 25th.
In the intereset of fairness I have to say they were packed and labeled beautifully, as we were worried we'd be getting someone else's shocks back, and they had been clearly well looked after. It seems that getting them repaired had required substantially more tooling remanufacture than previously anticipated, hence the delay. In terms of the future, apparently they are arranging someone to carry out these repairs in Australia so things should be smoother. Our final comment is that we live in the real world were nothing runs smoothly all the time. However, if companies keep you updated it's a lot easier to deal with.
As expected we spent wednesday 26th of sept. bolting the shocks back on and went for a quick spin in the evening. It would have been earlier but I forgot to charge the battery. I am a spanner. As anyone who has driven a clubman can tell you it was worth the wait. Each crackle of the exhaust on overrun had us giggling like infants and we had a ball. There is nothing like these cars to make you feel connected to the road and elements (and insects) although I have to ignore my bike riding mates who say otherwise. Bring on the summer.......
Saturday, October 20, 2012
Saturday, August 25, 2012
Racing Red Shocks by Nitron
In the interests of honesty I will relate our experience, from which you can draw your own conclusions.
During the build process and before the car was even running, we noticed a small leak of oil on the shaft of one of our Racing Red shock absorbers. Eventually, the end cap was forced off by the pressure and a whole lot more oil appeared. We were informed that this was a "known issue" by the distributer and that a solution was being arranged with the company. Apparantly a seal gland was incorrectly manufactured and this lead to the leak.
I'd rather like to believe that "known issues" with suspension components would lead to some sort of warning to customers to check their shocks, but, hey ho, what can you do? While the car was having its suspension aligned the guys noticed another of the shocks was leaking so now we had two fail out of four, which wasn't reassuring.
However, what has really prompted this posting is the subsequent fiasco. We pointed out this leak midway through 2011. It is now approaching the end of August 2012 and we still do not have our shocks back.
It took until June 2012 before it was decided that the shocks needed to be returned the the uk for repair and during this time we received no communication whatsoever from the company. They have now had them for two months and we have only received scanty updates via the distributer which they only obtained by repeatedly emailing them. Incidently, I called the company myself and was met by radio silence.
I really don't care why it took so long to organise - these things occasionally happen. And fortunately the weather has been pretty epic lately in Melbourne and not suitable for quick fangs in a sports cars. But eventually the summer will arrive and if they're not back by then we will be very unhappy campers.
Still, at least it allowed us time to fix the big end...........!
During the build process and before the car was even running, we noticed a small leak of oil on the shaft of one of our Racing Red shock absorbers. Eventually, the end cap was forced off by the pressure and a whole lot more oil appeared. We were informed that this was a "known issue" by the distributer and that a solution was being arranged with the company. Apparantly a seal gland was incorrectly manufactured and this lead to the leak.
I'd rather like to believe that "known issues" with suspension components would lead to some sort of warning to customers to check their shocks, but, hey ho, what can you do? While the car was having its suspension aligned the guys noticed another of the shocks was leaking so now we had two fail out of four, which wasn't reassuring.
However, what has really prompted this posting is the subsequent fiasco. We pointed out this leak midway through 2011. It is now approaching the end of August 2012 and we still do not have our shocks back.
It took until June 2012 before it was decided that the shocks needed to be returned the the uk for repair and during this time we received no communication whatsoever from the company. They have now had them for two months and we have only received scanty updates via the distributer which they only obtained by repeatedly emailing them. Incidently, I called the company myself and was met by radio silence.
I really don't care why it took so long to organise - these things occasionally happen. And fortunately the weather has been pretty epic lately in Melbourne and not suitable for quick fangs in a sports cars. But eventually the summer will arrive and if they're not back by then we will be very unhappy campers.
Still, at least it allowed us time to fix the big end...........!

Sunday, August 19, 2012
Knock knock knocking......yes, it's the big end!
During the last few shake down runs we noticed a clatter from the engine. Hard to locate and at first it sounded like the top end. We disconnected the injectors sequentially to see if it was from a particular cyclinder bottom end but that didn't help. Sadly, on the run back from the registration appointment the noise became much more obviously bottom end. Eek! Or words to that effect (possibly more Anglo-Saxon.)
 The sump was duly dropped and the cause confirmed. I'm no expert but a sump should not look like it's been used for silver panning. I think it was caused during brake testing when I had had a momentary drop in oil pressure. A split second, but thats all it needed to melt a bearing. A top up of 250mls of oil cured the drop but it looks like the damage had been done
Ford claims the short block is non servicable - it's not even mentioned in the Haynes manual - but that's never stopped us. We removed the big end caps and bearings, which was easy, followed by the main bearings, which was not. The bearing ladder is fun as you don't want to rock it and damage surfaces . We had to weld a socket to the end of an angled spanner in order to remove the bolts that go through the bearing seal - they're tucked behind the fly wheel under a lip and no spanner I had would reach them.

Number 1 cylinder bearings were melted, and the rest were starting to go, but fortunately the journals were ok. The main beaings looked pretty good but we decided to replace them at the same time. These can be removed by spinning them out one by one. We used a "spatula" made out of some thick plastic and wooden pushers made from dowl that had been filed flat at the edge to ensure nothing marked the surfaces. Once they started to move you could rotate the crankshaft and spin them out the rest of the way. Its best to replace each one as you go along or the crankshaft moves slighly on its axis, making replacement much more difficult. Don't ask how I know this......

We got replacement bearings from Raceline. They were very helpful in advising us - had it been a 2.3L engine we would've been in a lot of trouble as they are apparently much more sensitive to bearing size. They usually require the full monty of testing with plastigauge and multiple trial fits. Next we replaced the con rods with ARP items and then torqued everything back into place. The sump was refitted, the engine topped up with a full 5 litres of finest and the key turned. After a few tense turn overs the oil pressure shot up and we connected the ignition for a firing. It all went smoothly and now we have a knock free engine.
 So, to conclude - 1) The marks on the raceline dipstick are not filling lines - make sure the engine has 5L of oil at least and then mark the dipstick yourself. 2) It is possible to change all the bearings with the engine in the car. But avoid it. It's not fun. Really!
 The sump was duly dropped and the cause confirmed. I'm no expert but a sump should not look like it's been used for silver panning. I think it was caused during brake testing when I had had a momentary drop in oil pressure. A split second, but thats all it needed to melt a bearing. A top up of 250mls of oil cured the drop but it looks like the damage had been done
Ford claims the short block is non servicable - it's not even mentioned in the Haynes manual - but that's never stopped us. We removed the big end caps and bearings, which was easy, followed by the main bearings, which was not. The bearing ladder is fun as you don't want to rock it and damage surfaces . We had to weld a socket to the end of an angled spanner in order to remove the bolts that go through the bearing seal - they're tucked behind the fly wheel under a lip and no spanner I had would reach them.

Number 1 cylinder bearings were melted, and the rest were starting to go, but fortunately the journals were ok. The main beaings looked pretty good but we decided to replace them at the same time. These can be removed by spinning them out one by one. We used a "spatula" made out of some thick plastic and wooden pushers made from dowl that had been filed flat at the edge to ensure nothing marked the surfaces. Once they started to move you could rotate the crankshaft and spin them out the rest of the way. Its best to replace each one as you go along or the crankshaft moves slighly on its axis, making replacement much more difficult. Don't ask how I know this......

We got replacement bearings from Raceline. They were very helpful in advising us - had it been a 2.3L engine we would've been in a lot of trouble as they are apparently much more sensitive to bearing size. They usually require the full monty of testing with plastigauge and multiple trial fits. Next we replaced the con rods with ARP items and then torqued everything back into place. The sump was refitted, the engine topped up with a full 5 litres of finest and the key turned. After a few tense turn overs the oil pressure shot up and we connected the ignition for a firing. It all went smoothly and now we have a knock free engine.
 So, to conclude - 1) The marks on the raceline dipstick are not filling lines - make sure the engine has 5L of oil at least and then mark the dipstick yourself. 2) It is possible to change all the bearings with the engine in the car. But avoid it. It's not fun. Really!
Sunday, July 1, 2012
Exhaust Heat Shielding
.jpg) The first upgrade we planned was to heat shield the exhaust headers. I had been warned that there was some radiation from the headers into the footwell, but was not prepared for the reality. As the headers wrap around the drivers footwell they act like the element of an oven. Quite nice at first, but after about an hour's driving your legs start to poach. Any longer than that and in our car at least you can't touch the pedals without shoes on. I once reversed up the drive in socks after a bit of a fang and very nearly crashed. Not terribly smooth when trying to impress bystanders.....!
The first upgrade we planned was to heat shield the exhaust headers. I had been warned that there was some radiation from the headers into the footwell, but was not prepared for the reality. As the headers wrap around the drivers footwell they act like the element of an oven. Quite nice at first, but after about an hour's driving your legs start to poach. Any longer than that and in our car at least you can't touch the pedals without shoes on. I once reversed up the drive in socks after a bit of a fang and very nearly crashed. Not terribly smooth when trying to impress bystanders.....!

Saturday, June 23, 2012
Registered!!
Well, we finally made it. Obviously it wasn't straightforward as, on a typical Melbourne day, we watched a weather front move in across the bay on the radar maps. We must have angered the Gods with our car's unnatural beauty. 45 minutes before the appointment at Vic Roads the heavens opened, wet weather gear was donned and off we went. It rained both there and back, but fortunately there was a space undercover for the actual inspection. The inspector was a very nice chap and clearly a car enthusiast and before we knew it we were the proud owners of a road registered, home built, mobile swimming pool!
 It's a tremendous feeling and the drive home was fantastic. True, rain coats the inside of the screen as much as the outside due to turbulance, making the wipers decorative at best, and the semi slick tyres aren't the greatest when cold and driving through inches of water, but it was the most perfect drive I've had. It brings a huge smile just thinking about it now and needless to say all the effort to get to this stage is worth it for that moment alone!
Now, the real business of gradually upgrading the car begins.......!

Now, the real business of gradually upgrading the car begins.......!
Wednesday, April 11, 2012
High Stop Light
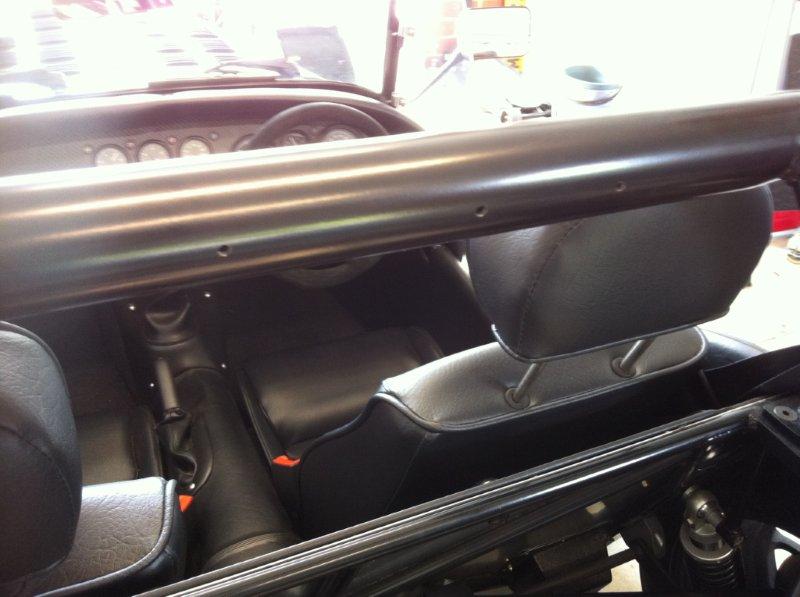 Great fun to drill and tap the holes. By the end of it you become paranoid that the light is the only thing that's level, and everything else is slanted. Become one with the spirit (level).
The only bright tip I have is that when routing the wiring through the roll bar, I grabbed an string off my trusty electric guitar to use as a mouse. It was flexible enough to pass through the curves, yet stiff enough to be pushed through in one go. Needless to say this brainwave occured after I'd spent an hour trying to drop weighted lines through. Ho hum......
Interior, Roll Cage and seatbelts
Not terribly exciting - however I do have a few tips to make things go smoother. Apologies to those with proper skills - these are aimed at novices like ourselves!
 1) When gluing the carpet, you cannot have enough ventilation. We had both ends of the garage open, and I was wearing a mask with gas filter filtted, but I could only stay in the footwell for a few seconds at a time without being overcome by the fumes. It was very unpleasant, especially when you stand upright afterwards. Make sure someone knows you're in there!
 2) The seats require holes to be drilled for mounting - take your time and allow space for the seatbelt stalks. Our engineer also required the headrests to be strengthened. A change in the ADR's means that they have to be higher, so we had them retrimmed and the mounting bars extended. This didn't bother me as in their original form, when positioned correctly for my head, they were only just inside the seat tubes - not much use if rear-ended by the 4x4 tanks round here! It also cost very little more than a scrap dealer was asking for second hand ute headrests.
 3) There's a hole at the back of the recess for the seatbelt retractor mechanism to sit in. You can't get a socket through it, so I pushed an extension bar through and manouvered the required socket around the side of the mechanism. You can just about get it onto the bar to tighten the retaining bolt, but not to be tried when feeling tired and cranky.
 4) On our chassis, the cross member that is attached to the top of the differential mount and that runs to the base of the roll bar mounting plate did not line up with the bolt hole for the roll bar. We found that you could use mole grips to clamp the boss against the lip of the roll bar mounting plate, thus allowing you to drop the bolt down easily. This can be done with the boot in place by removing a wheel and going through the wheelarch.You can just see the marks, despite having cloth wrapped the jaws. Where's the touch up paint?!
 1) When gluing the carpet, you cannot have enough ventilation. We had both ends of the garage open, and I was wearing a mask with gas filter filtted, but I could only stay in the footwell for a few seconds at a time without being overcome by the fumes. It was very unpleasant, especially when you stand upright afterwards. Make sure someone knows you're in there!
 2) The seats require holes to be drilled for mounting - take your time and allow space for the seatbelt stalks. Our engineer also required the headrests to be strengthened. A change in the ADR's means that they have to be higher, so we had them retrimmed and the mounting bars extended. This didn't bother me as in their original form, when positioned correctly for my head, they were only just inside the seat tubes - not much use if rear-ended by the 4x4 tanks round here! It also cost very little more than a scrap dealer was asking for second hand ute headrests.
 3) There's a hole at the back of the recess for the seatbelt retractor mechanism to sit in. You can't get a socket through it, so I pushed an extension bar through and manouvered the required socket around the side of the mechanism. You can just about get it onto the bar to tighten the retaining bolt, but not to be tried when feeling tired and cranky.
  4) On our chassis, the cross member that is attached to the top of the differential mount and that runs to the base of the roll bar mounting plate did not line up with the bolt hole for the roll bar. We found that you could use mole grips to clamp the boss against the lip of the roll bar mounting plate, thus allowing you to drop the bolt down easily. This can be done with the boot in place by removing a wheel and going through the wheelarch.You can just see the marks, despite having cloth wrapped the jaws. Where's the touch up paint?!
Monday, April 9, 2012
Exhaust System

Our exhaust was made for us at Meridian by Rob. We got an old muffler (from a truck I believe) and attached this to a catalytic converter supplied by Cateran. The cat has a californian spec mantel - presumably signed off by Arnie himself - and is euro 3 compliant. It's maybe overkill, but along with Pauls tuning skills, it contributed to us passing the IM240 first time. So there!


The flanges on the cat were angled as shown in the pictures, allowing the exhaust to pass neatly down the side of the car. Rob also welded on some bolts so a piece of rolled aluminium sheet could be attached as a heat shield. Finally, I lagged the collector with exhaust wrap so there are no exposed pipes which might upset Vic Roads come registration.
Sunday, March 11, 2012
Oil catch and Expansion tank

 We decided to place a small oil catch tank to connect vapour from the positive crank ventilation valve and the cam cover vent. This was bought from Car Builders Solutions who have supplied numerous bits and pieces during the build and who have always been extremely helpful over the phone and delivered very promptly. The unit is very small and the bracket was made simply by riveting an aluminium plate to two large hose clips which gripped the tank. The plate was shaped so it could be hose clipped to an adjacent chassis tube and the job was done. We ran the two vents via a Y-connector into the tank, and then ran the outlet of the tank into the the silicon hose behind the airfilter to remove excess vapour.
We have also added an expansion tank to the water rail to catch coolant when things get over excited. Again, it was a simple item from CBS, as above, and the bracket was a piece of bent aluminium attached to the mounting plate and padded with self adhesive foam. This then attached neatly to the from chassis cross member and is nicely out of the way. It is a bit low down and I'm not sure if it will return well when the radiator cools, but it is an underwater seal and the system should generate negative pressure so we'll see. At the least it will stop coolant from leaking everywhere.

Saturday, January 21, 2012
Bonnet hole
 This was pretty much our biggest fear. A perfectly painted bonnet which needed to be accurately cut for a complex 3-D shape to stick through, without stuffing anything up. I am not in any shape or form artistic nor talented with hand eye coordination. I once made a matchbox holder at school which consisted of 2 pieces of wood nailed together and I couldn't even cut that straight. Dad did keep it, but I think because if he had it, no-one else could ever see it.
 We made a template out of card to get a very rough form, leaving a lot of scope for expanding the hole later. We then used the dremmel for the initial cut, again keeping well within our markings and using lots of masking tape to protect against run away saws. Once we had this, we gradually expanded the hole using a metal file. It took a long time, mainly becauase I kept needing to lie down in a darkened room, but it did mean that we were in total control and could form the hole as desired.
 Its shape on the right hand side evolved as we went along, and was initially going to be a straight edge, but the curves fitted beautifully over the airbox and also exposed the "Reverie" label. It looks quite nice even if we do say so ourselves! We finished it with a rubber edging strip from Clark rubber and job done. I can sleep once more....
Saturday, December 24, 2011
Airbox

 We spent a while looking at options and designs of airbox. The main requirement was to fit under the bonnet without too much metal work so that we could mount the filter internally. This should mean a reasonably quite induction noise which will be essential to pass the noise emmissions test. We have been a bit worried about this element as I used to have a modified Peugeot 205 GTI which ran throttle bodies and sounded a bit like a canal barge trying to achieve earth orbit, even at idle. Fortunately A T Power (who supplied the throttle bodies) had a link to a company called Reverie, which makes among other things carbon airboxes in a multitude of designs. After much measuring up and head scratching we settled on a model that fits the bill, the Zolder 65 with shallow baseplate option.
 The next problem was mounting it - carbon fiber is not easy to cut, makes tonnes of very nasty dust and obviously is not cheap to replace if you get happy with the power tools. So we cut a template out of mdf wood to match the intakes and clamped it to the backplate. It was then straightforward to use a hole saw to make the apertures in the correct place and all was calm in the garage. It looks, although we are proud parents, bloody good....! We had to file down the quick release tabs so that they didn't stick up too far and then it was on to the next task - cutting the hole in the already painted bonnet. Eek!
Monday, December 12, 2011
Vacuum purge supply

 In order to have a vacuum supply to purge the carbon canister we had a piece of fuel rail section about 10 cm long drilled and tapped along the top to accept four hose adapters. The A T Power throttle bodies are supplied with blank ending bosses which can be drilled through to the chamber for just this purpose. The hoses were then connected up and this new balance chamber suspended from an engine bay cross member beneath the inlet trumpets. Finally, the ends of the rail section were plugged and tapped to fit a takeoff for the adjacently mounted MAP sensor at one end, with the other leading to the solenoid valve scavenged from the original Focus engine. I managed to modifiy (saw up!) the original bracket which has a nice fitted rubber collar for the valve, and by bolting this to extrusions which used to hold the water block at the rear of the engine we've been left with a very neat install. By my standards anyway......
 As a note, when the engine tuning started, Paul noticed a pressure oscilation in the balance chamber which was throwing off the sensor reading. We presume this is either resonance or due to a steal between a pair of TB chambers. Either way we were unable to eliminate it so in the end the MAP sensor was isolated from the vacuum balance chamber and now supplies atmospheric info. Paul was able to work around this in the tuning process and it hasn't affected us at all - as witnessed by the IM 240 pass recently. We may try a different design of chamber later on but, as the saying goes, if it ain't broke have a beer instead
Monday, December 5, 2011
IM240, the emissions.......
 Well, we can hold back no longer. The car went to VIPAC a couple of weeks back and..........passed the IM 240 with flying colours! To say we are happy is an understatement. We can only thank Paul Flourentzou and the guys from Chasers Motorworks once again - it was Paul's tuning skills and their help that got us through first time. In fact we got in well under the required emissions levels, so they really pulled it off.
It's not an easy route to take but hopefully this shows what's possible with an aftermarket ECU and throttle bodies.
Wednesday, November 9, 2011
Rear Lights
 We bought these lights from the Caterham shop as we felt they are closest to the look we are after. It's easy to make the rear of these cars look like a trailer (and I'm not totally convinced we haven't achieved that!) but whilst the round single units look more traditional they can also start to look a bit cluttered. You pay your money and take your choice.
 That being said, because we're having the spare wheel on board, the requirement for two reversing lights to keep visibillity up to happy engineer levels will look a bit overdone anyway. Ho hum, you can't have everything.
The process of fitting requires some masking tape, a spirit level and repeated check measurements from reference points. It's one of those tricky jobs and the complex curve of the rear guards means that when you finally tighten the retaining bolts, the rubber mounts of the lights can distort and change what you thought was a perfect level to ever-so-slightly off. So we will leave them to settle and adjust them gradually over time. It's exactly like trying to hang a picture on a wall thats not quite square....you're never totally satisfied!
Sunday, November 6, 2011
Centre Console
 We put this one off for a while as the molding didn't really sit squarely on the transmission tunnel leaving a few gaps. After a little shaping around the edges with a trusty file we got it to sit flush and central , so then we addressed the problem of mounting it. The manual (and I can hear other Birkin owners laughing at the mention of this word!) suggests riveting it in, but this means it is a harder job to dismount if you need access to heater controls etc so we looked at other options.
 Our solution was to position it and then place two strips of tape on its side, overlapping the edge with the transmission tunnel. We then cut the tape, removed the console and riveted two angles of aluminium sheet to the struts in the tunnel adjacent to the tape left behind. Next we drilled a hole through the tape marked console and offered it back up to the transmission tunnel. This allowed us to mark the bracket for a corresponding hole to be drilled. Finally, we used a speed nut slipped over the brackets to provide a threaded surface and voila - a removable centre console with the added side support of brackets.
It took less time to do than to describe, but we are insanely proud!!
The panel has controls for the heater, washer wiper, a 12volt power supply (in case we ever break down and mobiles are flat) and the LED for the immobiliser. It looks very smart and we are experiencing the sin of pride once more.
Saturday, November 5, 2011
New Loom
 As a result of our decision to run with throttle bodies midway through the build, we have removed the original loom and had a new custom loom created. This sounds mad, but we would have had to modify so much of the engine loom that it would be virtually new anyway. Fortuntely we were able to sell on the loom via the grapevine to another Birkin builder so we haven't lost out too badly.
 Our new loom was designed, made up and fitted by G.R. Motorsport Electronics and should, quite frankly, be in an art gallery. Like all genuine motorsport devotees, the chaps there really know their stuff, and were incredibly good to us throughout the whole process. Despite the fact that we must be pretty small fish to them they made us feel like we were developing a Le Mans special! We went with a Motec M400 on the recommendation of our tuner (more anon) as it had the power and flexibility to give us the best chance of pasing emissions testing requirements. He is also an expert with the software, which helps!
Monday, July 25, 2011
Confession time - Throttle bodies!
 We have planned from the start to attempt to pass emissions testing on throttle bodies rather than the standard Ford manifold and ECU. This was and is a less than easy approach. Everyone spoken to has warned of the difficulty. The fantastic thing about the clubbie community is that there is always help and people have been incredibly generous and frank - the last thing you need is to start something like this in the dark. However we are nothing if not stubborn! We suspected the emission requirements might relax a bit and this now being the case we feel we are in with a chance. In order to avoid large egg/face interface scenarios when it fails dismally we have obviously kept a bit quiet but now that we have confessed we'll keep the blog updated more regularly. We still have all the OEM manifold gear so if it does fail we will just bung that on again and mark it up to experience.
Anyone who may have read earlier post might have noticed the bodies in shot already - they are from a company called AT Power in the UK. They have been designed for the Duratec motor as direct to head replacements and they are magnificent. The quality if the engineering is outstanding and I have seen video of them running on a clubbie - the induction sound is outrageous. Yippee!!!
Carbon Canister and Fuel Reg 2
Not earth shattering but I remade the bracket for the carbon canister from aluminium strip - it won't rust and I can almost hear Mr. Chapman's approval. Or maybe it's Gordan Murray....one of the two. I also added a moisture/dust trap to the manifold pressure outlet on the fuel reg - this isn't used in my car as it's non turbo - by coiling some hose and lock tie-ing it on.


Sunday, July 24, 2011
Heater Fan
We attached the fan to its mounting point by drilling 2 holes in each side and making a small aluminium plate to act as purchase for the rivets. It was then riveted in place and the mounting bolts for the brake and clutch resevoir holder used to clamp the mounting plate firmly to the scuttle. This means that it is firmly attached despite being quite a heavy item and hopefully shuold keep supplying warm air for the Victorian winters in years to come!


Rear Caliper Issue
 On bleeding the rear calipers we discovered an issue - they leaked badly. After attempting to tighten them with force failed, we loooked a bit more closely and discovered the bleed valves were placed inside two adapters. This looked odd so we removed them to discover the adapters were BSP or NPT fittings that had beeen forced into a straight walled metric fittings. Any seal formed had been acheived by mangling the first few threads and bunging on some sealant.
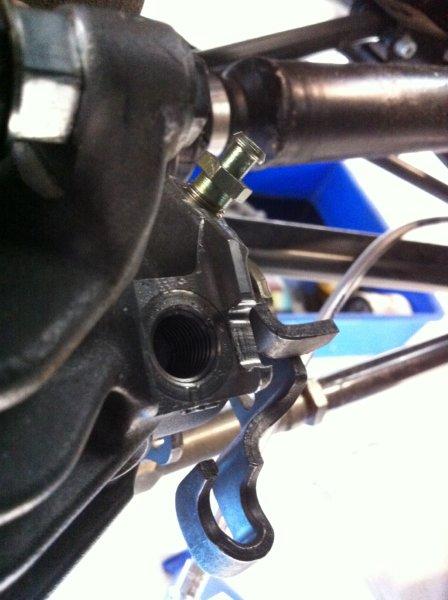 I would strongly urge those with birkins of this era to check up on the calipers as it is not a great engineering solution. After peering under cars with similar calipers it would appear that Birkin have swapped the position of the bleed valve and brake line - leaving a fitting too big for even a truck bleed valve and hence the "solution!" We had the original hole retapped and coiled and ground off the lip in the casing to allow the brake banjo fitting to leave the caliper at the right angle. This meant getting a larger banjo fitting attached to our brake lines and getting bleed valves that matched the original smaller holes but the end result is a system that has not leaked a drop and has the bleed valve at the highest point of the caliper where it was intened to be.
Subscribe to:
Posts (Atom)